If you're here after having made it through the Basic Wiki Editing tutorial, congratulations! You're now looking at the slightly more advanced things that can really add some flavour to what you've written. If you haven't read through the Basic version, I strongly suggest you do so by following the link above before proceeding with these aspects.
Adding and Adjusting Images[]
Uploading or Adding an image[]
Though relatively simple in essence, adding an image has a few small things you'll want to get used to. Uploading an image is very basic, and can be done simply by heading across to the right of the editing window and clicking the 'Photo' option. Much like when adding a hyperlink or making a page, a mini-window will appear and ask for the image you're after.
There are three options you can use to get your images:
- Browse will open up an upload selection window for you to select an image you want from your files. Once selected, you can hit the Upload button next to it to upload the file and insert it into your article.
- Find allows you to search for an image filename that you have already uploaded through the 'Add a Photo' section of the wiki.
- The Gallery below these two allows you to browse through all the uploaded images until you find the one you want.
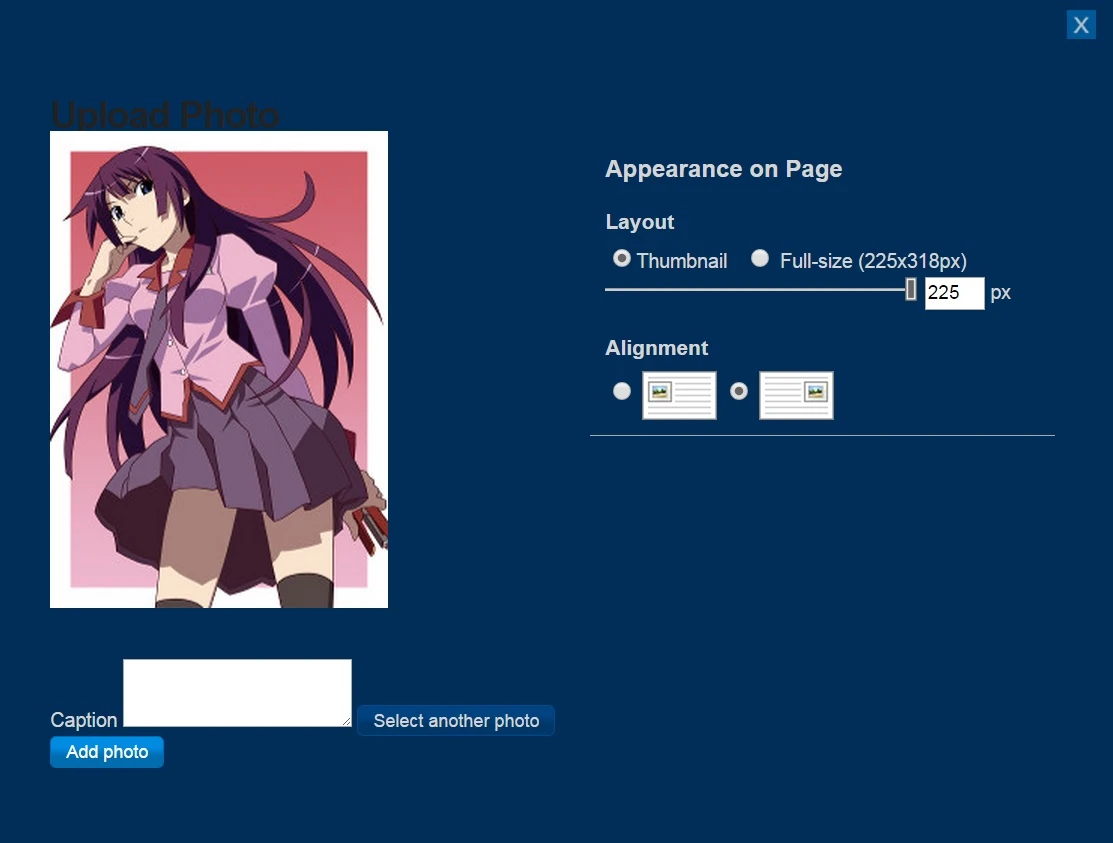
The Adjustment Menu[]
What a caption looks like
Once you have added or selected an image, the adjustment menu will immediately open up as a second stage, though you can also get to this menu by hovering over the image and clicking the 'modify' button in the top right of the image. From here you're presented with a few options to tailour the image to what you're after.
- Thumbnail/Full size buttons either leave the image as a smaller thumbnail on the page or the full sized variant.
- If you select Thumbnail, a slider will appear allowing you to adjust how small or large the thumbnail will be, up to a cap.
- Alignment lets you choose whether you want the image to be left aligned on the page or right-aligned. The image above is right-aligned, so it sticks to the right side of the page.
- The Caption box will allow you to provide an image with an associated caption, if you so choose.
Once you're done, just click the Add Photo button and voila, the image will now be attached to your page.
Positioning an Image[]
It's best to think of images as being a letter in text form when you're trying to reposition them. They have a place they fit into with the text which dictates which line they sit on. If you find your image isn't in the position you want it, or it's making the rest of your text really skewed up, just click and hold on the image itself and drag your mouse cursor.
When you do this, you'll see a line marker much like you do when word processing, which indicates where the image 'fits into'. The best places for these are behind the first word in a paragraph, or behind a header, or whichever section you want the image to focus on. Once you let go, the image should automatically adjust itself.
This sounds a little more complicated than it is - I'm sure after you've fiddled around a bit you'll get the hang of it very quickly.
Other Media Options[]
I won't be going into the other media options in this guide (Gallery, Slideshow, Slider, Video or Table) as I don't tend to use them, and you don't really have any need for them. That said, if you do want to use them to add a little bit more fancy flair, their menus follow similar styles to adding an image, so with a little bit of fiddling they shouldn't take too much to work out how to use them.
If you screw up somehow and want me to fix something you think is broken, give me a holler.
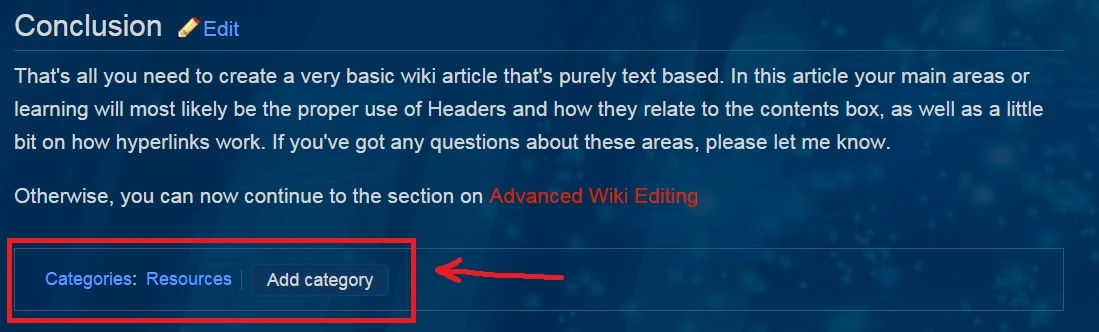
Adding a Category[]
This is an important part of finishing up a page and having it be easily found by other people. Beneath the media options you'll find a section called 'Categories' on the right hand side - you'll only really need to touch this once or twice any time you make a page.
Simple put, if you're making a Character page, type 'Characters' in the Add Category box and hit Enter. This places the page in the Characters category, so they'll so up when you go there. Locations are the same, as is Lore and other such things. If you think the page deserves an extra category or want to add a new one, feel free to write a new category name in the Add category box and a new one will be created.
If you forget to do it, don't worry about it - it's easy to go back in and add them later, and you can even do so from the published page itself! Right at the bottom of any page is a section where you can add categories to the page without heading into the Edit mode, a useful tool for the forgetful.
Creating and Filling an Infobox[]
Okay, here is where we get into the real meat of the matter. This is probably the most complicated thing you'll have to do on any page, and is a must-have for Character pages. Thankfully, once you wrap your head around it, it's an incredibly simple thing to master. All of the code has already been written for you and is functional, you just need to fill it in.
How to Add an Infobox[]
Remember back in the Basic guide when I mentioned the Source tab waaay up just above your tools bar? We're going to be using that for this, but thankfully for you this is the simplest thing I can think of doing in the source bar. (There are other ways to add an infobox, but this method is the easiest way to avoid any screw-ups).
- When you open up your page (or have created a new one), click on the Source tab (it's right up there next to Visual. If you're seriously having trouble finding it, look at the minilogo for the site in the top right and follow the line -directly- across the title until you find two small tabs saying Source and Visual).
- Once you hit source mode, you'll notice a new variety of tool buttons are above the editing window - do not worry about these as you will not be using them. In fact, once you've hit source, don't touch any buttons; this will help you immensely.
- Find the Character Infobox Page or follow this link to get to it. The instructions for use can be found on that page, but for the sake of understanding I'll reiterate them here.
- Find the box of code on that page under the title of Syntax. Highlight and copy everything from the box, then head back to your page in which you have the Source tab open.
- If you have a fresh new page, just paste it into the source, but if you have a page that already has some writing and data in it you'll have to go to the top of it, select the VERY top of everything you've done and press enter twice to create a gap, then paste in the code you copied. This is to ensure that the Infobox stays at the top of the page.
- Congratulations! You now have a fully working infobox attached to your page. Currently, however, there's no information in it, so we'll have to correct that.
Filling in the Infobox[]
I've added this as a separate section to allow you to take all this information in chunks and proceed at your own pace. Thankfully, this isn't a particularly complicated thing to do either.
On the Character Infobox page, you'll notice that there are three things - The code which you copied and pasted in, a second box of code below which contains a filled out version, and the final resulting Infobox that is based on everything in the filled out sample on the right of the page. This should help you see what sections of code refer to which sections on the final product, but for the sake of ease I'll go into what you need to do:
With each section of the code, you're likely to find fields that look like this:
Name             =
Image            =
And so on. All you need to do to fill in your infobox is the following:
Name             = Alicia Augustine Archard
Image            = Alicia001.jpg   (or whatever filename the image you uploaded has)
It's that simple. No need for fancy code, no troublesome weird things, just fill it out like a form and you're golden. The only field you need to ignore is the one that called 'Images' after image - I'm not sure what it does, but when I remove it from the infobox formatting the whole thing implodes and the universe blows up, so just ignore it and move along.
Once you've filled out all the fields, you're done! You can hit Preview at any time to see how you're progressing. If you happen to hit Visual, you're like to see a tiny green puzzle piece at the top of the page - don't worry! This is normal, that's your infobox. Just tab across to Source again and everything will still be there.
Hit publish and voila! Fully working infobox on a page. Again, if you fuck up or come across a problem, give me a bump and I'll hover across.
Using Code to Enhance the Infobox[]
Remember when I said you didn't have to use code when filling out the infobox?
Yeah, I lied.
For the most part you don't. An infobox is perfectly fine as it is without it, but there are a couple of features that will be pretty useful if you want to add them in, especially if you want to make the Family and related sections look a lot cleaner.
Vertical Breaks[]

The title refers to what you can see in the image to the right - multiple entries into a single Infobox field that are stacked vertically. This isn't possible by just pressing enter and writing text, you actually have to use code to get this to work. Thankfully for you, it's the simplest piece of code you will ever learn.
Normally, when you fill out a box you'll make it:
Enemies = That One Guy, Crystal, Dwarven Magic
Or something in order to get them all on one line and still separated. However, in order to achieve the effect in the image, you'll have to do the following:
Enemies = That One Guy<br>Crystal<br>Dwarven Magic
The 'br' section applies a 'break' to a new line. That's all you have to do to add multiple things into the same field.
Adding Links to Field Entries[]

Once again, I'm going to bring up this image as an example. You'll notice that the 'That One Guy' entry is simple text whilst the 'Crystal' and 'Dwarven Magic' entries are blue Hyperlinks - these will actually take you to the respective pages when you click on them.
It's a useful thing to have if you're referring to actual people as Friends, Enemies, Family or otherwise, or if a page exists for something you're going to put in the Infobox. Once again, whilst this DOES require code, it is incredible simple code.
To make a hyperlink to a page, all you need to do is surround the text with brackets:
Friends: = [[Alicia Archard]]
You can apply this alongside the previous code as well, creating what you see in the image:
Enemies = That One Guy<br>[[Crystal]]<br>[[Dwarven Magic]]
Those are really the only two sets of code you'll need to bother with when it come to infoboxes, and hopefully they're not too complicated to use.
Being a little shit about Entry Field Links[]
That's right, you heard me - you can be nice or mean to people with this complicated yet incredibly amusing little technique. You'll notice that when you add hyperlinks normally, the window both asks you for the 'Page Name' you want to link to, but also the 'Text Displayed' for the link. Normally these two are the same, but they don't have to be, such is the case for this link right here. Though it says what it says on the page, it links to the Resources category. You can do the same thing with Infobox code, such as if you want to call someone a little shit but still link to the person mentioned and provide context.
These links work incredibly similarly to the code before in that they fit in double-square brackets, but there's a key difference. Here's the example I used above:
[[Summer Jiang|a little shit]]
The actual link is placed in the first section after opening the brackets. Then, after separating them with a vertical line | , the second half covers the text you want to display. This easily works within Infoboxes, so feel free to mess around if you're willing to get a little complex.
Conclusion[]
Hopefully after this supplementary guide you'll have all you need to know about setting up pages and messing with them. If you've managed to get all this, you've got all the tools you need to make high quality pages and you won't really need anything else to go with them. That said, if you want to experiment go for it! The only reason I ended up knowing about most of this stuff is because I did a lot of research and looking around, so if you want to know more, there are two things you can do:
- Fuck around with the extra added media features
- (My personal favourite) Go to your usual wikis and if you find something you like, hit 'edit page' and go to the Source tab section - and steal their code! I've done this for multiple things and have adapted them to my own purposes - you might notice that the Infoboxes we use are awfully similar to the ones used on the Kill la Kill wiki.
Go nuts, and I hope these helped!